In the first post of this series, we talked generally about end to end testing and why I chose Protractor and Typescript specifically for this tutorial, and in the second part we built a simple test together and discovered how to run it.
In that simple application we have built in the first part, we had two main directories in the application. The first is the Page Object Model (POM) where the web elements selectors and their accessors live, and the second is the specs folder where the logic and the test cases steps are running. This post will discuss the first directory -POM- in more details.
How Protractor is selecting elements?
To facilitate selecting elements, Protractor exports a global function element. This function takes Locator and returns ElementFinder object. That returned object has a set of actions were populated as methods to perform actions on the selected element. So that after selecting an element, you can play with it depending on its type. You can click on , hovering over, selecting options from, typing inside, and/or get text from this web element depending on its type. In fact there is a bunch of other actions you can do, some of them are a little bit complex to perform some advanced operations. Those actions will be discussed in detail later in this post. That’s all you need to know about the ElementFinder object for now. But you need to know more about the Locator …
This Locator on a low-level is an object of type webDriver.Locator returned by a function. Every selection possible way to be discussed in this article (and some few more!) are either returned by a method, or assigned to a property which will be passed to the element global function to locate the web element in the DOM. All these methods and properties are members of a collective object called By object. In the editor you are using, you can refer to this object either as ‘by’ or as ‘By’. Both of them are aliases to a ProtractorBy class. For me, I prefer using ‘By’ (with capital B) because it’s more aligned with the standard naming conversions which state that the object should start with a capital letter. But if you are coming from a python background for example, you may be used to using the ‘by’ (with small b) instead and it should be fine.
So, The full view is that you will pass a selector to the element method to get a web element and start applying actions to it. Many examples are coming soon.
Select using basic locators
There is a ton of selectors which are supported by Protractor, Some of them are natively implemented in Protractor, which means they aren’t usable in other test automation frameworks, and others are inherited from the webDriver and those are publicly used for all the test frameworks based on the webDriver. You can find the full list of available locators and a quick example on how to use each one of them on the official API reference on protractor website. All the selectors are usable in the same way regardless they are native or inherited.
If there was a very good planning between the development and testing team from day zero in the project planning, the front-end developer should use names, ids, and tags for every web element or at least most of them. But when it’s not always the case, we always need to select other different selector than the basic ones, and in the basic locators we will cover the below:
- Select by
id: The most straight forward way to select a web element is by its id.element(by.id('id_value'))
<ul id="engineers">
  <li id="developer">Mostafa</li>
  <li id="tester">Moataz</li>
</ul>
// Returns the web element for Moataz
let tester = element(by.id('tester'))
expect(tester.getText()).toBe('Moataz')
- Select by
name: Another easy way to select a web element is by its name.element(by.name('name_value'))
<ul id="engineers">
  <li name="developer">Mostafa</li>
  <li name="tester">Moataz</li>
</ul>
// Returns the web element for Moataz
let tester = element(by.name('tester'))
expect(tester.getText()).toBe('Moataz')
- Select by
tagName: User can also select a web element by its tagName.element(by.tagName('tag'))
<a href="http://www.google.com">Google</a>
// Returns the web element for Google
let website = element(by.tagName('a'))
expect(website.getText()).toBe('Google')
- Select by
linkText: The final selector to be mentioned in this section is the linkText.element(by.linkText('text'))
<a href="http://www.google.com">Google</a>
// Returns the web element for Google
let website = element(by.linkText('Google'))
Select using CSS
In many of the cases, there are none of the previous basic locators are used and in this case, we need to use more advanced selectors. The first option is to use one of the css selectors. There are many css selectors which are supported in protractor and here is a list of each of them by example:
- Select by
css: This selector can be used by one of three ways. For the following html sample:
<ul class="engineers">
  <ul class='software-engineers'>
    <li class="developer">Mostafa</li>
    <li class="tester">Moataz</li>
  </ul>
  <ul class='other-software-engineers'>
    <li class="developer">Mohammed</li>
    <li class="tester">Asmaa</li>
  </ul>
</ul>
- By taking the full css tree of an element and the full tree will be built by css of the element to be selected proceeded by the classes of all its parents, and as you may know every css class must start by a dot in the css tree. So the selector will be something like that: ‘.parent.child.elementToBeSelected’, and you can have as many as children in the tree based on the level of the element you want to select.
  // Returns the web element for Moataz
  let tester = element(by.css('.engineers.software-engineers.tester'))
  expect(tester.getText()).toBe('Moataz')
2.By taking the css class of only the element to be selected in case that this css class is unique. So in the above HTML example, you should be able to select the ‘software-engineers’ element using its class only. But you can’t do that for an ‘element’ because there are two web elements in the snippet with this class and in this case, a warning message will be shown and the first element matches this css will be retrieved. So using something like element(by.css('.tester')) will retrieve that element with ‘Moataz’ content not ‘Asmaa’. So be careful when you are using the exact match of css.
3.By taking a relative css class. This is done by passing two css classes. The first one will be considered as the css of the element you need to select, and the second will be the startNode. This specifies an element or Node from which to search for elements. So you are telling Protractor here to select a specific element relative to another one. Actually when passing only one css class (as mentioned in the second point above), the second parameter is set to document by default behind the scenes and here is an example to use it:
// Returns the web element for Asmaa
let tester = element(by.css('.tester', '.other-software-engineers'))    //same as (by.css('.tester .other-software-engineers'))
expect(tester.getText()).toBe('Asmaa')
- Select by
className: This selector is working exactly like the css selector if you passed an exact css class (the second case mentioned above) and here is an example:
<ul id="engineers">
  <li name="developer">Mostafa</li>
  <li name="tester">Moataz</li>
</ul>
// Returns the web element for Moataz
let tester = element(by.className('tester'))
expect(tester.getText()).toBe('Moataz')
- Select by
cssContainingText: This is one of my favorite selectors. As you can get from its self-explanatory name, this selector returns the element based on the text inside its css class and clear enough it takes two arguments: The first for the css class and the second for the text and here is an example:
<ul id="engineers">
  <li css="developer">Mostafa</li>
  <li css="tester">Moataz</li>
</ul>
// Returns the web element for Moataz
let tester = element(by.cssContainingText('.tester', 'Moataz'))
What makes this selector special for me are two points: The first is that you don’t need to give it the exact value of the text containing by a web element. It’s enough to give it a subString and it will select the element for you. In many practical situations, it’s high efficient. So imagine that you have a page which renders a table with too many data and you want to select all the rows which contains a specific company name or user id. So all what you want is just specifying the css class of each cell in this table and pass the company name or any parameter you want to select all the cells which contains this value. So it works like a built-in search feature within your application. I know that with this paradigm you will receive back an array of elements instead of one element. But don’t worry, this will be fully covered in a below section about finding multiple elements.The second special thing about this selector is that it’s super easy to be written. Once you need to select an element, all what you need is to get a text inside it then you will just pass this text and the css class to get this element selected. You don’t need to bother about the css class uniqueness or start identifying how many levels you need to move up in the DOM to find something unique you can select in this element with and in a real life task, time efficiency is one of the key factors to select a specific selector and this will be discussed later in this article.
- Select by
deepCss: This selector is a little bit an advanced one and rarely used in practice. It selects element by css within the shadow DOM. If you don’t know what the shadow DOM means, you can go to this article. It’s super subtle and informative, in the same time gives the full details about what’s the shadow DOM with many example and here is a quick example about how it works:
<div>
  <span id="outerspan">
  <"shadow tree">
    <span id="span1"></span>
    <"shadow tree">
      <span id="span2"></span>
    </>
  </>
</div>
let spans = element.all(by.deepCss('span'));
expect(spans.count()).toEqual(3);
For now, we talked about the four possible css selectors available for Protractor, and may you haven’t known that css and className selectors are inherited from the WebDriver when cssContainingText and deepCss are native Protractor selectors until someone tells you this piece of info. This is clear because there is no difference between how to use any of them at all. And that’s the power of Protractor. It extends the WebDriver to be wider and wider and supporting more features with better performance in native syntax.
At this point, we covered the syntax of how to use the css selectors family and we will discuss more about the performance and usability of them in the next part of this tutorial. Also more advanced techniques will be detailed in that next part. But what you may need to keep in mind by the end of this section is - Whenever the chance to use a css selector comes, don’t hesitate!.
Select using XPath
Another farewell way to select web elements is to select by XPath. XPath is efficient in finding the complex or dynamic elements whose attributes are changed dynamically on refresh or any other action taken by the user. XPath stands for XML path. It is a syntax for finding elements on a web page using XML path expression using HTML DOM structure. In other words, XPath contains the path of the element positioned at the web page and a standard syntax for an XPath is xpath=//tagName[@attribute='value']. ‘//’ selects the current node, ‘tagName’ specifies the tagName of a particular node, ‘@’ selects an attribute, ‘attribute’ identify the attribute name to be selected, and finally ‘value’ equals the value of this attribute.
There are two types of XPath: The absolute XPath and the relative XPath. They are similar to the absolute and relative paths of files used on hard desk. Let’s discuss both of them in more details.
Absolute XPath: AKA the full XPath. This is the full path of an element starting from the root node to the element which set to be selected, and an example of an absolute XPath is something like </html/body/section/article/div[10]/div/pre/code/span[53]> (copied from the current page that you are reading on). If you don’t know how to get the full XPath of an element, all what you need is to right click on that element in the web page, click ‘Inspect’, select ‘Copy’, and then ‘Copy full XPath’. As you can see it’s always starting with a ‘/’ which stands for the root followed by the parent tag ‘html’.
As you can see, The absolute XPath is that it’s very long. It makes your code not readable and as a result, maintaining and fixing your code become an absolute hassle. But it’s not the main drawback of using the absolute XPath. Imagine that you are selecting an element, and a front-end developer added just another element in one of the parent nodes of the element that you are selecting, Then your selector will be pointing to another completely different element than the desired one. The same will happen if someone added or deleted a parent element in the tree. It’s as same as what happens if you saved a physical path to a directory on your hard desk, and suddenly you added a new sub directory any place in the tree then your saved directory won’t work anymore.
Relative XPath: As mentioned in its name, the relative XPath is the location of an element relative to another node not relative to the root. It starts with the double forward slash ‘//’, which means it can search the element anywhere at the WebPage so that you can start from the middle of the HTML DOM structure and no need to write long XPath, For the above absolute XPath </html/body/section/article/div[10]/div/pre/code/span[53]> we can retype it as ‘//code/span[53]’. But in this case, you need to make sure that there is only one code node which has a span child and if not, you need to start locating element from the node which gives you a unique element. In the above example (which is taken from the current page source) there are seven elements will be retrieved if we use the mentioned relative XPath. Now you have two options to translate the full path to an accurate relative XPath:
First: Start searching for a unique start point: When we started from the direct parent of the node to be selected, we got 7 elements but if we moved one node backwards, the number of the options will be at most equal to those 7 elements and that’s straight forward. You can’t find an element in a longer XPath unless it’s already existed in the child’s XPath so we will start moving backwards node by node until getting the most accurate XPath to be used. So we add the parent ‘pre’ to the absolute XPath to be ‘//pre/code/span[53]’ and check if it’s a unique element but unfortunately it isn’t. So we will keep doing until finding the unique element, this ends up with this relative XPath ‘//div[10]/div/pre/code/span[53]’. But you can see that it’s not the best relative XPath possible! That’s why we will move to point 2.
Second: Start searching for a unique identifier for the desired node: What I mean, being a unique identifier is a unique tag name, and from the first look you can think about the css content which is ‘http://localhost:4444/wd/hub’. But if you searched by it, you will find 5 different elements and after a sharp look, you can find that a combination between the css class of the parent and the text of the current node solves the dilemma.You can type it as //code//*[text()='http://localhost:4444/wd/hub']. You can also note that there is an additional * after each of the second double slashes in the XPath. YES! it’s the syntax to tell the browser “please, select all the elements with those criteria for all tags”, and it’s inspired by the asterisk meaning in the regular expressions.
In fact, you can still get a relative path by right clicking on the web element in the web page and click ‘Inspect’ then ‘Copy’ and ‘Copy XPath’. It will copy a unique relative XPath for your selected element. But it’s still not the best relative XPath so you may need to go for one of the above ways to get a less fragile relative XPath.
Finally, to select an element by XPath, you should write a statement like that:
element(by.xpath('absolute or relative xpath'))
In short sentences. XPath is a syntax to tell the browser the position of an element in DOM. It could be either absolute or relative. The relative is more readable and so that more efficient to be used and we discussed how to transform an absolute XPath to a relative one. Actually, we haven’t written the most perfect XPath yet. More tips and tricks are shown in the next part of this tutorial. Stay tuned ;)
Select multiple elements
In many cases, you don’t need to select only one element. Instead, you need to select multiple of them. For example, you need to select all the code snippets in this blog post’s page and in this case, you need to use a different method than element method. As stated, ‘element’ method takes a locator as parameter and returned a selected ElementFinder. Protractor supports it using the element.all method which takes a locator also but returns ElementArrayFinder. Here ‘element’ is nothing more than an element helper. The selection method is the ‘all’ method, to use it write element.all('some-locator') and an array of web elements will be retrieved (ElementArrayFinder in lower level). Let’s talk about that ElementArrayFinder object in more details.
The ElementArrayFinder is used to set up a chain of conditions that identify an array of elements. In particular, you can call all(locator) and filter(filterFn) to return a new ElementArrayFinder modified by the conditions and you can call get(index) to return a single ElementFinder at position ‘index’. More details are coming about this point in future parts.
Similar to jquery, ElementArrayFinder will search all branches of the DOM to find the elements that satisfy the conditions (i.e. all, filter, get). However, an ElementArrayFinder won’t actually retrieve the elements until an action is called, which means it can be set up in helper files such as page objects before the page is available and reused as the page changes. You can treat an ElementArrayFinder as an array of WebElements for most purposes, In particular, you may perform actions such as click or getText (to be discussed in an upcoming section) on them as you would do on array of WebElements. The action will apply to every element identified by the ElementArrayFinder. The array has length equal to the length of the elements found by the ElementArrayFinder and each result represents the result of performing the action on the element. Unlike a WebElement, an ElementArrayFinder will wait for the angular app to settle before performing finds or actions. Exactly as ElementFinder does. Again, it’s another area of power of protractor.
The notation of using ‘all’ function is straight forward:
<ul class="engineers">
  <li class="developer">Ahmed</li>
  <li class="developer">Ali</li>
  <li class="developer">Mohammed</li>
  <li class="developer">Monica</li>
  <li class="developer">Mohannad</li>
  <li class="developer">Mostafa</li>

  <li class="tester">Asmaa</li>
  <li class="tester">Hagar</li>
  <li class="tester">Moataz</li>
  <li class="tester">Rabab</li>
</ul>
// Returns the web elements array of developers
let developers = element.all(by.class('developer'))

// Returns the web elements array of testers
let testers = element.all(by.class('tester'))

expect(developers.getSize()).toEqual(6)
expect(testers.getSize()).toEqual(4)

// Similar -> element.all(by.class('tester')).get(2)
let moatazTester = testers[2]
expect(moatazTester.getText()).toBe('Moataz')
Select from Google Chrome console
In the previous sections, you may find a difficulty. Every time you are selecting an element, you need to run your project to discover if it’s got selected correctly or different element is caught instead, and to get something indicating, you are logging something to the terminal like the variable name which holds that element or trying to get its inner text or any another idea, Of course it’s a huge time consumption and it’s not appropriate to do that! But what’s the solution for that?
There are many solutions to that, and my preferred one is to use the browser console as a selection live demo to check if the expression you are writing is working well or there is something broken. Of course if you are selecting an element by its name or id it’s not tricky and you don’t need to run your solution. You almost need to check those elements selected by either css or XPath. Fortunately, Google Chrome supports it natively with no need to install any extensions.
To select an element using css, all you need is to open the console inside Google Chrome and type $('your-css-selector'), To select an element by XPath type $x('your-xpath-selector'). For example if you have an element with css class css-class you type $(‘.css-class’) to select it by css or type $x(‘//div[@class=”css-class”]’) to select it by XPath. Those commands select all the elements which matches the used selector. So if your selector isn’t accurate enough and selects many elements, you can know that from the console and start playing with your selector until it works perfectly with you.
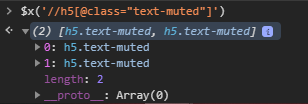
Here is the view when you are selecting from console. The below details are retrieved about the selected element(s):
- The first line is a summary to the selected elements indicating the number of them and the main class of each of them.
- Line for each of the selected elements. Each line is clickable to show the details of that element.
- Length property which tells what’s the number of the selected elements explicitly.
Implement actions on selected elements
After selecting elements, we need to perform some actions on them. Those actions are user-driven actions. This means that we need to perform all the actions which user can do. You can find the comprehensive list published on the official documentation. Here is a list of the most commonly used selectors with quick example. As usual, with the same html snippint:
<ul class="engineers">
  <ul class='software-engineers'>
    <li class="developer">Mostafa</li>
    <li class="tester">Moataz</li>
  </ul>
  <ul class='other-software-engineers'>
    <li class="developer">Mohammed</li>
    <li class="tester">Asmaa</li>
  </ul>
</ul>
isPresent: Checks if an element is existing or not. It returns a promise of boolean which can be checked to be true or false as following:
expect(element(by.css('.software-engineer.tester')).isPresent()).toBe(true)  //element exists

expect(element(by.css('.software-engineer.technical-support')).isPresent()).toBe(false)  //element does not exist
isElementPresent: Checks if a sub-element is existing or not.
expect(element(by.css('.software-engineer')).isElementPresent('.tester')).toBe(true)  //element exists

//This is equivalent to the previous command
expect(element(by.css('.software-engineer')).element.by('.tester')isPresent()).toBe(true)

expect(element(by.css('.software-engineer')).isElementPresent('.system-admin')).toBe(false)  //element does not exist
click: Not much description is needed here. The only note to be mentioned here is that you need to check if the element you are applying this action to is really clickable because if you tried to click on an element which is not clickable (i.e. text field), some warning will be received and at some edge cases, exception may be thrown and the test will fail.
sendKeys: This action is used to fill the text fields. It takes a string as parameter and fill the selected web element by this text.
element(by.css('input[type=username]')).sendKeys('moatazmasters@gmail.com')
getText: Gets the visible innerText of this element, including sub-elements without any leading or trailing white space. Visible elements aren’t hidden by CSS. This action got used many times before in the selecting by css and selecting by XPath sections.
clear: clears the value of this element. This command has no effect if the underlying DOM element. Most of the time, you will use this action before start typing inside an element to make sure that this element will contain only the text you type once you finish typing.
Conclusion
At the end of this post, here are all the areas covered in this post:
- The way that Protractor works to select elements.
- How to select elements using the basic locators.
- Quick look on the basic CSS selectors (more is coming in part 3)
- What’s an xPath and how to use it to select elements
- How to select multiple elements in one command
- How to use Google Chrome console to make sure that you are writing the correct selector.
- Finally, how to implement actions on a selected element.

Author
Moataz Mahmoud
A muslim guy who is coding by day, playing tennis by night, watching Bayern and Manchester City by weekend, listening to music all the time.
moatazmasters@gmail.com
Comments