Motivation
Ten years ago, websites tended to offer a very specific series for the users. But day by day, this idea got demolished and huge corporates tended to put as many features as possible in a single website. For example, previously you were visiting Facebook only to share your updates for your friends and connections. Currently, you can visit Facebook and go live, selling some of your stuff, shopping online, attend watch parties, get a list of events in a specific location, attended online courses, and so many more. The same idea for many of big companies such as Amazon, Booking, and uber. Even for those applications which are specifically produces one service, there is a much huge details and complementaries about this service are offered now compared to many years ago. Google maps is a good example here.
The more websites get more complex, the more release process turns into headache. Until some stages, where the release may turn literally into a nightmare. And one steps into the road to get rid of that nightmare is to use test automation. In the normal process of release, you are interested in two testing processes. The first one is testing the release tasks and all the areas of the software which may be affected with those tasks. And other one is testing the whole software to make sure that the new features didn’t harm the software in any of its parts deliberately or not. We call this type of testing regression testing. Testing the release task could be done manually easily (when it’s preferred to be done automotive), but the regression testing is not efficient to be done manually. Most of time, your system has many thousands of test cases. Running all of them manually every release consumes too much time. Also, if you had the time, the eyes of the testing team get used to the function of the system. So, they assume that all the parts of the system that were working well in the previous releases will work normally here. Especially those features which we didn’t edit them. But the actual result may differ.
As conclusion, we need to develop automation test plan for the regression testing automating all the test cases which we need to run every release.
What’s end-to-end testing
When we are talking about web-based automation testing. There are many stages you as a software tester should implement automation testing. The first stage and the straightest forward is to try to simulate every simple action that your website user can do from the browser. This type of testing is called end-to-end testing or simply e2e. The second stage is the API testing level. At this stage you simply write automation scripts to test the expected response of every end point in your system. At another stage you do the integration testing. At the complex systems, the developers implement unit tests to test every component isolated to the system (in all the systems actually they should not only the complex ones). So, the development team sends you a collection of components everyone is confirmed that it’s working as expected on its own. And you as a tester should develop scripts to make sure that those components will be coherent when they are talking to each other. This series will focus only on the first stage which is e2e. Maybe we cover the other stages later.
End-to-end testing workflow
When we are building test scripts, there are three main layers in the architecture.
Here is a picture which shows the 3 main component of a testing framework
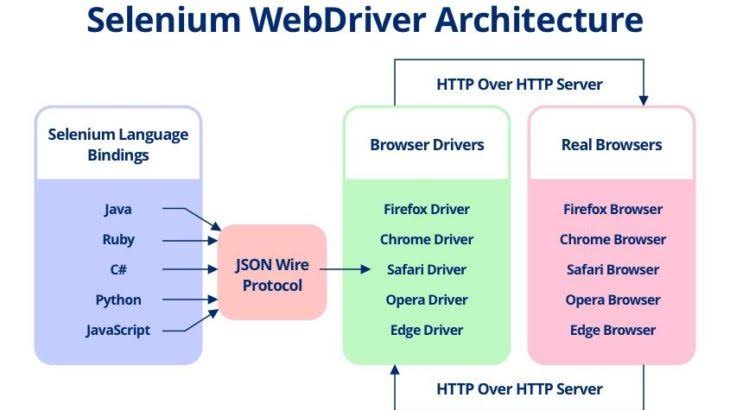
- Real Browser: You must have at least one of the browsers installed on the machine to be able to create and run the tests. It’s recommended to install all the browsers that your clients will use.
- Selenium WebDriver: For every real browser, there is a Selenium driver. For example, if you want to run your tests against Google Chrome, you need to install Selenium’s Chrome WebDriver. And so on …
- Testing Bindings: Here is where our comparison fits in. Whatever we will use Selenium Java or any of the JavaScript libraries, you MUST have the above two layers. Then, you need to use one of the automation tools. Either to use one of the Selenium’s extensions. And in this area, Java is the most powerful option (to be discussed in detail below). The other option you can use one of the JavaScript libraries that can do the job for you. There are many options here too. You can use Protractor, TestCafe, or Cypress.
Why to use Protractor
It’s no secret to anyone that Selenium is the most popular tool to be used in e2e automation. There are two main reasons behind that popularity. First, it was the first major stable tool appeared. So, the testers started using it heavily before the other frameworks come to the arena. And step by step it becomes harder and harder to replace the old code written in Selenium by any other new framework. The other reason that it supports many programming languages. And mostly, the testers aren’t the best programmers in the field. So, as a tester, you may have a hands-on experience only coding in one or two programming language. So, it’s easier and more practical for you to start using a tool with whatever the programming language you know that learning a completely new programming language to start automating in another framework. But let’s talk more practically, is Selenium really the best option? For me, at least, nope! Protractor is better for me and more practical. And here are some reasons why Protractor is my favorite pick:
- Protractor works perfectly for both angular and non angular apps: Protractor was built basically to test angular pages. But it’s no longer than a few months until they make it supports non-angular pages with only a small flag added to the config file. In case of Selenium, it was built for testing the non-angular pages, but when it comes to angular ones, it suffers. Selenium will work in Angularjs , but it will get synchronization issues. Selenium WebDriver code is not friendly for Behavior Driven Development such as jasmine and mocha. Angularjs needs to identify the elements which are not recognized by Selenium for ex: ng-model, css, … etc. But in Selenium Webdriver this can be achieved only via the required identifiers or unique class to access the elements. It takes more effort and time, when does the same in Selenium. Someone may say that Protractor uses Selenium webdriver and it uses the Selenium js driver with its own wrapper to support angular context helper methods, but why we need to prefer use of Protractor than Selenium for testing Angular and Angularjs applications? Well, it’s true that Protractor uses Selenium js driver with its own wrapper, but Protractor provides some new locating strategies which are very helpful to automate the Angular applications. For example, Protractor provides you with waitForAngular, By.binding, By.repeater, By.testarea, By.model, … etc. Sometimes it is difficult to capture the web elements in AngularJS applications using JUnit or Selenium Webdriver. Protractor supports Angular-specific locator strategies, which allows you to test Angular-specific elements without any setup effort on your part. Also, Protractor has the addLocator function to help you add your own locators. So that, for a fictional example, you can get elements by their handlebar’s properties.
- Protractor is much easier to develop: To discover how easier Protractor development compared to Selenium (regardless your knowledge in JavaScript), go ahead and spot the differences between this example written once in Protractor and another with Selenium.
describe('Google Search', function() {
    it('should work', function() {
        browser.get('http://www.google.com');
        element(by.name('q')).sendKeys('webdriver');
        element(by.name('btnG')).click();
        expect(browser.getTitle()).toEqual('webdriver - Google Search')
    });
});
var assert = require('assert'),
    test = require('selenium-webdriver/testing'),
    webdriver = require('selenium-webdriver');

test.describe('Google Search', function() {
    test.it('should work', function() {
        var driver = new webdriver.Builder().
            withCapabilities(webdriver.Capabilities.chrome()).
            build();

        driver.get('http://www.google.com');
        driver.findElement(webdriver.By.name('q')).sendKeys('webdriver');
        driver.findElement(webdriver.By.name('btnG')).click();
        driver.getTitle().then(function(title) {
            assert.equal(title, 'webdriver - Google Search');
        });

        driver.quit();
    });
});
You can see the huge difference between the ease of development and the readibility as a result. No need to point to which is the Protractor snippet and which is the Selenium. The first one is the Protractor of course.
- You don’t need to add waits or sleeps to your test: Protractor can communicate with your AngularJS app automatically and execute the next step in your test the moment the webpage finishes pending tasks, so you don’t have to worry about waiting for your test and webpage to sync.
- Protractor is written in JavaScript which is dynamically typed: There are too many advantages of using dynamically typed languages in test automation, but the main power is that there is no compile time. In a static typing language, every time you change a single command in your code you need to build it again. But in the dynamically typed languages, there is no more such a burden. Every time you change your code and run, the interpreter won’t generate a byte code from scratch, it will just start running your code line by line with no need to take the overhead of compilation time. You can get more details about this from this magnificent paper. What’s really impressing when using Protractor, that you have the option to use JavaScript directly which is a dynamically typed language or start writing in TypeScript which is a statically typed one. So, you have the luxury of selecting the more suitable option for your project.
- Protracor is much faster than Selenium: Do you remember the previous example which is written above once in Protractor and another in Selenium? When I tried to run it, it took 11 seconds in case of Protractor compared to 20 seconds for Selenium. Actually, whatever the test that you are running, if you tried to write in once in Protractor and another in Selenium, you will find that most of the cases there is a huge difference in the running tim between Protractor and Selenium.
- Using Jasmine: Protractor uses Jasmine, the framework you use to write AngularJS unit tests. And Javascript, the same language you use to write AngularJS apps.
- It is easy to set up page objects: Protractor does not perform WebDriver commands till an action is needed, i.e., set up page objects so that tests can operate page elements without moving the HTML.
Getting things ready
In order to write protractor tests the only mandatory prerequisite is getting protractor installed. And to get protractor install all what you need is node installed on your machine. But there are many other components that can ease the process of development. So, first of all let’s get node and protractor installed and then install the other preferences.
The first thing to install is node.js. And you can find a full guide to install it on whatever platform through this tutorial.
To make sure that node is installed on your version, just open your terminal and type npm --version.
The next step is to install Protractor. And it can be simply done from the terminal by the following command:
npm install -g protractor
This will install two command line tools, protractor and webdriver-manager. Try running protractor --version to make sure it’s working. The webdriver-manager is a helper tool to easily get an instance of a Selenium Server running. At the very early beginning, you should be able to use it to download the necessary binaries with webdriver-manager update
The next tool to be installed is VSCode. It’s not mandatory to use VSCode. You can use whatever text editor you like, when of cource VSCode is one of the best and richest with its huge set of plugins and extensions. We will work through this tutorial on VSCode, but it will be highly similar to the other text editors. Its installation process is straight forward. All you need is just download the suitable version according to your operating system from here and then install it as you do for any software tool on your machine.
Now we will work step by step on how to create a new test project and configure it to be able to use TypeScript to write your first Protractor test.
The first step will be to create a folder for your test project. Then open this folder using VSCode, and click ctrl + ~ to open the terminal. Again type npm -v to make sure that your project can see the globally installed version of node. Now type npm init. This command is to initialize the project for you. And after this command runs successfully, you can find that there is a package.json file got created for you. By default the content of this file should be something like that:
{
  "name": "test",
  "version": "1.0.0",
  "description": "",
  "main": "index.js",
  "scripts": {
    "test": "echo \"Error: no test specified\" && exit 1"
  },
  "author": "",
  "license": "ISC"
}
We will add our dependencies in the bottom of this file, after the last line "licencse": "ISC" add the next code segment.
  "dependencies": {
    "@types/jasmine": "~3.5.0",
    "@types/node": "~12.12.21",
    "protractor": "~5.4.2",
    "jasmine": "~3.5.0",
    "typescript": "^3.6.2"
  }
In the dependencies section we are defining three main frameworks. The first is Protractor, which is the framework we will use to write the e2e tests. The second is Jasmine. Jasmine is a behavior-driven development framework for testing JavaScript code. It does not depend on any other JavaScript frameworks. It does not require a DOM. And it has a clean, obvious syntax so that you can easily write tests. And finally TypeScript. TypeScript is a typed superset of JavaScript that compiles to plain JavaScript. It supports any browser, any host, any OS, and it’s open source as well. TypeScript compiles to clean, simple JavaScript code which runs on any browser, in Node.js, or in any JavaScript engine that supports ECMAScript 3 (or newer). TypeScript offers support for the latest and evolving JavaScript features, including those from ECMAScript 2015 and future proposals, like async functions and decorators, to help build robust components.
There are two BIG advantages to use TypeScript instead of plain JavaScript. The first is intelliSense. IntelliSense is a code-completion aid that includes a number of features: List Members, Parameter Info, Quick Info, and Complete Word. These features help you to learn more about the code you’re using, keep track of the parameters you’re typing, and add calls to properties and methods with only a few keystrokes.
And the second main advantage is that TypeScript supports OOP originally. But you may ask why it’s that important to use OOP in an e2e test framework? Well, this point will be discussed in the last section when it comes to discussing the (POM) Page Object Models section.
After adding your dependencies to the package.json file, you now need to install them. And to do that all what you need is just going to the terminal and type npm install. This command will install all the dependencies that are included in the package.json file and it’s not installed before. So in case that there is a tool installed before -as for protractor in our case- the npm will review the version and set the current project to the mentioned version in the package.json file.
In addition to add the dependencies, we need also to edit the scripts section. This section shows what are the scripts to be run when this project is run. Edit the scripts file to something like that:
"scripts": {
    "tsc": "tsc",
    "pretest": "npm run tsc",
    "test": "protractor convertedjs/specs/landing-page/config.js"
  },
The first script is the transpiler and will be discussed in detail in a few lines. The second script contains a script which will be run before the third one. So, if the third script is tagged as “test” the second one has to be “pretest”. And in this example, that command runs the transpiler. Will discuss the whole story of the transpiler very soon. The last script is the name of your test and it will be a shorthand to the traditional way to run a protractor test. To run a protractor test you need to type protractor config.js where config.js is the configuration file of your tests (will be discussed in the next section). But just to abbreviate it every time in the running, we map protractor path/to/configuration/file to a placeholder which is simply “test”. You can use any placeholder according to the feature that you are testing. For example, it may be “login” for login test script, “dashboard” for dashboard test script and so on. We will take a look a little bit later about running the project, don’t worry! Just edit the scripts section and jump to the next part.
You can see that once you run npm install for the first time, npm creates a node_modules folder to save all the installed dependencies in it. So, if you open that node_modules folder, you will find too many subfolders including the dependencies you have installed. Now, in node_modules > typescript > bin folder, you will find a tsc file. This file is called the transpiler. The function of that transpiler is simple. It just converts the written TypeScript into JavaScript. As you may know, TypeSctipt can’t be run directly to a machine. It needs an intermediate layer to transfer it to JavaScript and then run the JavaScript. But wait a minute! Why to write in TypeScript when it will be converted to JavaScript at the end? Why not to use JavaScript directly? The reason is developing in TypeScript is more features rich. As we mentioned before, it supports intellisence and has OOP by its nature. So, you will get the advantage of those features and write from your end in TypeScript. And don’t bother with the running process. All what you need is just call the transpiler and it will translate the written TypeScript to JavaScript and run it. Also, after we will try this feature, we will find that the generated JavaScript is much more readable for the machine more than any JavaScript that any human being can develop. Yes, it’s less human-readably, but it doesn’t matter. You won’t need to read the converted JavaScript. All your focus will be on TypeScript.
I understand that at the first glance it may be a little bit confusing. But believe me, you will feel how easy it is once you start use it. So don’t hurry ;)
Now we need to configure this project’s transpiler. And to do so we need to use --init option to generate the transpiler’s configuration file. So type node_modules/typescript/bin/tsc --init and a tsconfig.json file will be generated. Open this file, and after neglecting all the commented commands, it looks like:
{
  "compilerOptions": {
   "target": "es5",                          /* Specify ECMAScript target version: 'ES3' (default), 'ES5', 'ES2015', 'ES2016', 'ES2017', 'ES2018', 'ES2019' or 'ESNEXT'. */
    "module": "commonjs",                     /* Specify module code generation: 'none', 'commonjs', 'amd', 'system', 'umd', 'es2015', or 'ESNext'. */
    "strict": true,                           /* Enable all strict type-checking options. */
    "esModuleInterop": true,                  /* Enables emit interoperability between CommonJS and ES Modules via creation of namespace objects for all imports. Implies 'allowSyntheticDefaultImports'. */
    "forceConsistentCasingInFileNames": true  /* Disallow inconsistently-cased references to the same file. */
  }
}
No need to go into the details of those options. They are just auto-generated configurations auto generated for getting the transpiler works properly. All the needed here is to add the two following configurations to the end of the CompilerOptions list.
    "outDir": "convertedjs",
    "types": ["jasmine", "node"]
The first configuration is telling the transpiler where to store the generated converted JavaScript. In this case, it will generate a folder in the main directory of the application with name “outDir”. This folder will be created for the first time to run the transpiler. And every further time it will run, will generate a new ‘convertedjs’ directory replacing the old one. And the next configuration is just telling the transpiler to rely on node and jasmine in the transpiling process.
If we run the transpiler in this way, all the code written in TypeScript in our project will be converted to JavaScript. But we don’t need the node_modules to be converted. So we will add the last configuration to the end of the config file and outside the CompilerOptions list. This last configuration will be "execlude": ["node_modules"].
Writing your first test
First of all, you can find the complete project used in this tutorial through this link.
After a pretty long journey of configuring the project, finally here we are to start writing a sample test :D. This part of the turorial just implements a very simple test case. And in the next parts of the tutorial, more advanced test cases will be implemented.
The simple test case will be just opening the website that you are currently reading this article on, and expect that the main title of it is Moataz Mahmoud. To do that, we will create two directories in the main project directory. One with name “POMs” -stands for Page Object Models-. And the other one is “specs”. The first folder will contain all the page objects in the test project. And the second folder will contain all the test cases in the project with their configuration. Let’s talk about every one in detail. In other words, as e2e is all about implementing all the user scenarios, all the script will do is locating elements and interacting with them. The process of locating the elements will be included in the POMs. And the process of building a method for every possible element interaction will be also created in the POMs but be used in the specs.
Page Object Models
The idea of POMs is considered as a best practice in the software development world. The idea simply is isolating the web elements the script will locate and the methods that will be interacting with them from the rest of the application. And encapsulate them in The main reason behind that is not to get the chance to any script to get the chance to any component of the code to change the item locators. You can say that the locators are the most valuable and sensitive values in the e2e process as whole. So we are protecting them. So build a private variable for each web element, and create as much public accessors as needed to deal with that web element. So if there is a button, obviously you will need to click on it. So create a private variable to locate that button, and a public method to click on it.
In our case, we need to locate only one element in one page. We need to locate the element which contains the title in the landing page. So in the POMs directory, create the LandingPage.ts class. And then add one element to it called websiteTitle for example. So the LandingPage.ts file will be something like:
import  { element, by } from 'protractor'

export class LandingPage {
    private websiteTitle = element(by.css('.site-title'))
}
Regarding to the first line, it’s to import element and by objects from the protractor module. When we are using VSCode and TypeScript, so we can use the auto-complete and auto-import features. All what you need to auto-import any library from any defined module in the node_modules is to type its name and click ctrl + space which is the default auto-complete shortcut in VSCode and automatically it will be imported for you. Do that with both element and by keywords, and the first line will be auto-generated. Don’t panic with the selection method and what that element and by keywords work. It’s the topic of the next post.
Now the need to creat a method to deal with that element. Again we don’t need to let any other component from outside the landing page to be able to change the contents of the websiteTitle variable. So it’s made as a private member and will create a public method to let the meant specs file to be able to interact with it. And in this point, all what we need from the websiteTitle is to get its contained text. So here is a function to get it. This function won’t be marked as private or public because the default access modifier in TypeScript is public.
getWebsiteTitle() { return this.websiteTitle }
That’s all for the simple LandingPage page object model. Let’s move to creating the runner to check this test case.
Specs
In the specs directory, we will create a subdirectory for each test suite. In this example there is only one test suite -which actually contains only one test case-. So there will be only one subdirectory -for now- called for “landing-page” for example. This subirectory will contain only two files, one for the configuration and another for the actual specs. Let’s discuss each one on its own.
The config file
This config file will hold some data like the browser to run the tests with, the test to be run, and the selenium web address. Protractor supports a huge set of known browser. We will use Google Chrome in our case, but feel free to use any other browser. The specs to be run here is only ‘test.js’. Note that it’s ‘test.js’ not ‘test.ts’. Again, you can’t run a TypeScript file directly. Instead you generate a converted JavaScript version and run it. The selenium address is also been set here and all the time it should be set to: http://localhost:4444/wd/hub. The final component of the configuration file is the parameters. The idea behind this parameter section is to keep a single point of contact to them, as well as keep them shared between all the files which can access that configuration file. For example, in our case there will be a base URL parameter which holds the URL of the website where the test cases will run against. If we kept it only in a specific file, so it will be only accessible to its contents. So we can say that the params section is where we store the global variables of project. The final view of the config file should be:
import { Config } from "protractor"

export let config: Config = {
    capabilities: {
        browserName: "chrome",
        unexpectedAlertBehaviour: 'accept',
        chromeOptions: {
            args: ["--start-maximized"]
        }
    },

    specs: ['LandingTest.js'],

    seleniumAddress: 'http://localhost:4444/wd/hub',
}
The spec file
Let’s talk about this file’s structure first. As mentioned before, this file will contain all the logic in the test cases. And one of the highest skills of a software tester is being well-organized. That organization is being used all the time by the suppliers of manual software testing providers. And it’s one of the top reasons why I prefer using Protractor over too many other options when it comes to test automation. It’s super organized. The main strucure of it is simple. In each file you can list many test suites. In each test suite you can list many test cases. the describe block represents a test suite and the it block represents a test case. So a simple file structure could be as following:
describe('title of a test suite: ', () => {
    it('title of a test case.', () => {

    })

    it('title of another test case.', () => {

    })
})

describe('title of another test suite', () => {
    it('title of a test case.', () => {

    })

    it('title of another test case.', () => {

    })
})
You can add as many test suites as you want in the same file. Also each test suite can hold any number of test cases. But keep in mind too many test cases by a test suite, or to many test suites by a file isn’t a good practice. It makes the code harder to be read. And also if there is a specific test cases failed in a test run, it becomes harder to trace its failure if there are too many others in the same test suite.
In this section I’ll show the complete version of the file and then dig deeper to its details:
import { LandingPage } from "../../POMs/LandingPage";
import { browser } from "protractor";

let landingPage: LandingPage

describe('landing page test case: ', () => {
    it('expecting the title of the blog to be "Moataz Mahmoud"', () => {
        landingPage = new LandingPage()
        browser.waitForAngularEnabled(false);
        browser.get(browser.params.baseURL)
        expect(landingPage.getWebsiteTitle().getText()).toContain('Moataz Mahmoud')
    })
})
As you can see, the code is self-explanatory. It’s one test suite with one test case. The test case is ‘expecting the title of the blog to be “Moataz Mahmoud”’. At first, it creates a local object of a LandingPage class. And the scope of this object and where is the best place to define it will be explained in detail in one of the coming posts. The next step is to tell the runner to stop waiting for Angular modules to be loaded since it’s not an Angular website. If you are testing an Angular application, then you will pass this line. Of course you don’t want your test to start playing with the content of the page without waiting it to be fully loaded in this case. And make sure that this line is written somewhere before calling the browser.get() function.Then it opens the browser, hits the base URL, and finally expects the page title to be ‘Moataz Mahmoud’. That’s all for this test.
Running the test
The final step is to run the test. And there are two main steps to be done to run any Protractor test. First you have to run webdriver-manager start. This command will start up a Selenium Server and will output a bunch of info logs. Your Protractor test will send requests to this server to control a local browser. You can see information about the status of the server at http://localhost:4444/wd/hub. The next step is to type npm run test where test is the name of the script you had previously defined in the package.json file. And once this command starts running it runs three other nested commands. The first command is npm run tsc where tsc is the mapping for the transpiler which you again should have been defined in the package.json file. This command run the mapping which will run the transpiler to generated the JavaScript version of the test. And the final command is the Protractor command which run the config file of the desired test. Once that last command runs, an instance of the browser you defined in the config.ts file should be opened with the defined options -Google chrome in our case-. AND EVENTUALLY, SET BEACK AND ENJOY YOUR TEST RUNNING 🎉🎉🎊.
The final note here is that you can show the details of your running process in the terminal. If the test got failed, you can find a detailed log in the terminal.
Wrap up
Quickly speaking… To build a test project you need to:
- Get all the dependencies installed.
- Configure the linter.
- Build the page object model.
- Write the configuration of the test.
- Write the specs.
- Fire the tests up from the terminal.
That’s all for the first part of the tutorial. Hope that it was interesting journey. More details and advanced topics regarding to using Protractor for e2e will be covered in the next few posts. so keep tuned! And I want to greet everyone who is still running until this very last line!

Author
Moataz Mahmoud
A muslim guy who is coding by day, playing tennis by night, watching Bayern and Manchester City by weekend, listening to music all the time.
moatazmasters@gmail.com
Comments